
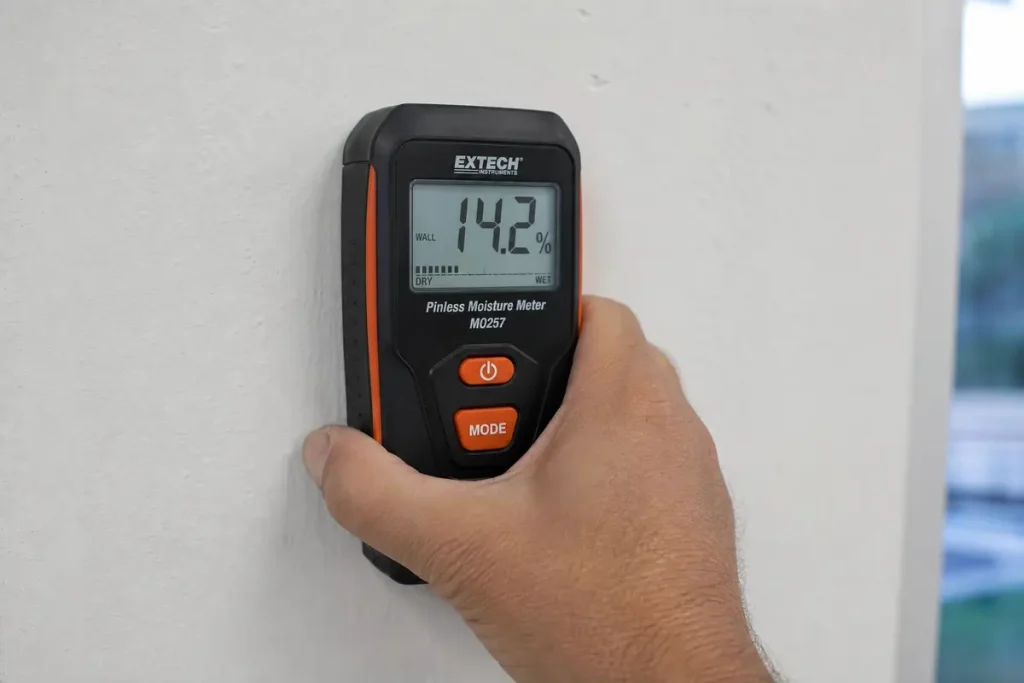
A capacitance moisture meter is a pinless tool that estimates moisture below a surface by sensing changes in an electric field. If you have ever stared at a brown ceiling spot in Old Louisville or a warped floorboard after a winter pipe break and wanted answers without punching test holes everywhere, this is the tool that gets you started fast. The catch is simple: a capacitance moisture meter is extremely useful, but only if you understand what the reading actually means.
What a Capacitance Moisture Meter Actually Measures
A capacitance moisture meter does not “see water” the way a camera sees light, and it does not suck moisture out of a wall and measure it directly. Instead, it reacts to how moisture changes the electrical behavior of the material under the sensor. In plain English, the meter lays an invisible field into the surface, and wetter material disturbs that field more than drier material.
That makes it a practical first-pass tool for property damage work. You can glide it across drywall, plaster, flooring, ceilings, trim, or subfloors and find areas that read differently from the surrounding material. That speed matters when you are trying to figure out if a dishwasher leak stopped at the kitchen cabinet toe-kick or spread under the whole run of flooring.
Here’s the direct claim: pinless meters are fast, useful, and easy to misuse. If you treat every high reading like proof of active water, you will make bad calls. If you use the meter to compare materials, map spread, and guide the rest of the inspection, it becomes one of the most useful tools in a moisture investigation.
How Pinless Moisture Readings Work
At the core, a capacitance meter sends a low-frequency signal into the material below the sensor plate. That signal creates an electric field that extends a certain depth into the wall, floor, or ceiling. The meter then measures how the material affects that field.
Dry building materials such as drywall, wood, and plaster have one electrical signature. Add water, and that signature changes sharply. The meter detects that change and converts it into a reading on a display. Depending on the model, that reading shows up as a relative number, a bar graph, a wet-dry indicator, or a percentage scale for certain materials.
This is why the tool works so well for scanning. You are not stopping to poke holes every few inches. You are checking for patterns. Wet areas stand out because the field responds differently there than it does in nearby dry material.
The Role of Capacitance in Simple Terms
Capacitance sounds technical, but the basic idea is not hard. It is a measure of how a material stores and reacts to electrical energy. A simple way to picture it: think about how a stud finder reacts when something behind the wall changes. A capacitance moisture meter works on a similar principle. It responds to differences inside the material, not just what your eyes pick up on the painted surface.
That matters because surface appearance lies all the time. A wall can look dry and still hold moisture in the cavity or in the plaster keys behind the finish. On the flip side, a stain can stay visible long after the structure has dried. The meter helps separate appearance from conditions.
Why Water Changes the Reading so Much
Water has a much higher dielectric constant than most building materials. “Dielectric constant” just means how strongly a material responds to an electric field. Drywall, wood, plaster, and insulation react one way. Water reacts far more strongly.
So when water gets into a material, the meter sees a much bigger disturbance. That is why a damp wall section often jumps out clearly against a nearby dry section of the same wall. The meter is not guessing blindly. It is picking up a real electrical difference caused by moisture.
The trick is that other things also affect that field. Dense plaster, metal lath, foil-backed insulation, and wiring can all change the reading. Water is a major cause of high numbers, but it is not the only one.
What “pinless” Really Means
Pinless means the meter reads without puncturing the surface. No probes. No holes. No pin marks in finished trim, hardwood, wallpaper, or painted drywall. That is a big deal in occupied homes, rental units, office suites, and historic interiors where you do not want to turn a moisture check into a cosmetic repair.
It also means the tool is non-destructive and fast. You can scan a ceiling leak path in minutes, map a basement wall after seepage, or check around a shower wall without turning every test into a repair item.
But pinless does not mean absolute. A pinless meter does not perform a lab moisture-content test. It estimates moisture conditions by reading electrical change beneath the surface. That distinction matters.
The Main Parts of a Capacitance Moisture Meter
Once you know what the meter is measuring, the next step is understanding the tool in your hand. Design differences matter more than most buyers realize. Some models are good enough for one leak check. Others are built for repeated property inspections where documentation and consistency matter.
Sensor Plate and Scan Area
The flat plate on the back or bottom of the meter is the sensor area. That plate has to sit flush against the surface for the meter to read properly. You are not measuring a tiny needle point. You are measuring an area under the plate and within the meter’s depth range.
That wider scan area is one reason pinless meters are so useful after water damage. You can sweep across a wall and see where readings rise and fall instead of hunting one pinhole at a time. It also means contact matters. If the plate rocks on heavy texture, trim detail, or debris, the reading gets less reliable.That wider scan area is one reason pinless meters are so useful after water damage.
Consistency is the whole game. Same pressure, same contact, same scan speed, same material.
Display Scales, Reference Numbers, and Alarms
Meter displays vary a lot. Some give a simple relative scale from low to high. Some include wet-dry color bands. Some show a moisture percentage for wood. Some add an audible alarm that kicks in when the reading crosses a threshold.
The big mistake is assuming every number means the same thing. It does not. A “32” on one meter is not automatically the same condition as a “32” on another. And a percentage reading on wood does not translate directly to drywall or plaster. In many building materials, the number is best treated as a reference value, not a literal moisture content.
That is why nearby comparison matters more than the label on the screen. If one side of a hallway wall reads low and the section under a bathroom line reads much higher, you have useful information even if the meter is only showing relative values.
Shallow Vs. Deep Reading Modes
Some meters offer more than one depth mode. A shallow mode focuses on moisture near the surface. A deeper mode reads farther into the assembly. That difference matters in real buildings.
A ceiling stain after a roof leak often holds moisture in layers above the paint. Flooring problems often involve trapped moisture in the subfloor, not just the finish surface. Wall cavities can stay damp behind apparently dry paint. Depth modes help you sort out whether you are seeing leftover surface dampness or retained moisture deeper in the assembly.
Deeper scans are useful, but the trade-off is broader sensing. You get a bigger picture and a little less precision about the exact layer causing the reading.
Where Capacitance Meters Work Best in a Property
https://www.youtube.com/watch?v=2DUcteBbucM
A capacitance meter earns its keep in finished spaces where speed and low damage matter. It is especially useful in the kinds of property issues that show up around Louisville: roof leaks after wind-driven rain, basement seepage, appliance leaks, frozen pipe breaks, and storm water that gets pushed sideways into wall assemblies.
Drywall, Plaster, and Painted Walls
Finished walls are where pinless meters shine. You can move quickly across painted drywall and identify suspicious areas without leaving behind a row of probe holes. That makes the tool a natural fit for occupied bedrooms, living rooms, hallways, and rental units between tenants.
Plaster deserves special attention. Historic plaster in older homes is denser than modern drywall and often sits over wood lath or metal lath. That changes the baseline. In an Old Louisville house with thick plaster and multiple paint layers, you need to compare one area of the same wall to another, not compare plaster readings to the drywall in a back addition.
Painted surfaces also hide a lot. Water can travel sideways before it shows itself. If you are dealing with signs of moisture trapped inside a wall assembly, a pinless scan helps trace the problem past the obvious stain line.
Hardwood, Laminate, and Subfloors
Flooring is another strong use case because water spreads under surfaces before damage becomes obvious. A capacitance meter helps you track that spread under hardwood, engineered wood, laminate, and exposed subfloors.
That matters because visible damage shows up late. By the time boards cup or blacken at the seams, moisture has usually moved farther than you think. A pinless meter lets you identify the boundary while the floor is still mostly intact.
Subfloors tell the real story. A kitchen supply line leak, refrigerator line failure, or overflowing toilet often pushes moisture beneath the finish flooring and into the sheathing below. Scanning both the finish surface and any accessible underside gives you a much better sense of the footprint.
Ceilings, Trim, Cabinets, and Insulation-adjacent Areas
Ceilings often show the first visible clue, but not the full path. Water from a second-floor bathroom line can travel along framing, show up near a light fixture, and keep moving into a hallway wall. A meter lets you follow the pattern.
Trim and cabinets also matter because finished wood and composite materials swell fast. Baseboards near slab edges, vanity toe-kicks, cabinet side panels, and window trim often hold moisture longer than the adjacent wall finish.
Areas near insulation deserve extra caution. Moisture around roof penetrations, HVAC lines, and exterior walls often lingers in concealed spaces even after the visible surface dries. If the readings stay elevated and the pattern keeps spreading, pairing the meter with a way to see temperature differences that reveal hidden wet can sharpen the diagnosis.
What the Readings Mean , and What They Do Not Mean
This is where bad decisions happen. A high reading feels definitive, but a capacitance moisture meter works best as a comparison and mapping tool. You are looking for meaningful differences, not worshipping a single number.
Relative Readings Vs. Moisture Content Percentage
Many capacitance meters display relative readings on non-wood materials. Relative means comparative, not absolute. The number tells you how strongly that area is affecting the meter compared with drier or less conductive areas.
Some meters also show a moisture content percentage, but that feature is usually intended for wood and wood-based products under certain conditions. On drywall, plaster, concrete, brick, and tile assemblies, that “percentage” is often just a reference scale dressed up as something more exact.
That is not a flaw. It is simply the nature of the tool. If you know the scale is comparative, you can use it correctly.
Baseline Readings Are the Trick
The best reading in the room is often the first one, taken from an area you believe is dry. Same room. Same material. Same finish. Same thickness if possible.
That baseline gives you context. Without it, a “high” reading is just a floating number. With it, you can tell whether the suspect area is materially different. Scan the dry wall beside the stain. Then scan the stain. Then keep moving outward until the readings fall back toward baseline. That is how you map the boundary.
This works especially well after cleanup. If a dehumidifier has been running for two days after a supply line break, the surface may feel dry. Baseline comparison still shows whether deeper material remains elevated.
A High Reading Does Not Always Mean Active Water
A high reading means the meter detected a stronger electrical response. That response often comes from moisture. It also comes from salts, dense finishes, metal lath, wiring, corner bead, pipes, foil-backed materials, and certain adhesives.
Pattern recognition helps. If the meter spikes in a narrow straight line, suspect metal. If every reading on one old plaster wall runs higher than the drywall in the next room, suspect material density. If a ceiling scan jumps near a can light, the fixture and surrounding components may be influencing the field.
A reading starts the investigation. It does not finish it. If the pattern points to concealed moisture and the risk is high, adding another non-destructive method that spots hidden damp areas or selective invasive confirmation makes the result far more dependable.
What Affects Accuracy in Real Homes and Buildings
Manufacturer brochures like to make the process look clean. Real buildings are not clean. Old repairs, mixed materials, wiring, texture, debris, humidity, and recent drying all change what you see on the screen.
Material Density and Composition
Denser materials read differently. Plaster, tile, brick, concrete, and engineered products all interact with the meter differently than drywall or pine trim. That difference becomes even more pronounced in older buildings with repairs layered over repairs.
A bathroom wall, for example, may include tile, mortar, cement board, fasteners, plumbing, and patched drywall in the same scan path. That is not one material. It is a stack. Your reading reflects the stack.
This is why same-material comparison matters so much. Compare oak to oak, drywall to drywall, plaster to plaster. If you want a broader breakdown of how different tools behave on different materials, sorting out the main moisture-testing options helps.
Metal Behind the Surface
Metal is the classic troublemaker with capacitance meters. Nails, screws, pipes, corner bead, metal studs, ductwork, wiring bundles, metal lath, and foil vapor barriers all distort the field.
The pattern usually gives it away. Metal often creates sharp, abrupt spikes or a consistent line where framing or bead runs. Moisture tends to spread more organically, following gravity, framing bays, flooring seams, or leak paths.
Historic plaster with metal lath is a common trap. In that situation, the meter is still useful, but mostly for relative changes within the same wall and for locating areas worth checking more closely.
Surface Conditions and User Technique
Technique matters more than beginners expect. If the sensor plate does not sit flat, the reading changes. If you drag the meter too fast, the display lags and you miss transitions. If debris, grit, or old paint flakes sit on the sensor, contact gets uneven.
Gloss paint and heavy texture can also complicate readings because the meter is no longer making fully consistent contact. The fix is simple: clean the pad, use full contact, move slowly, and repeat the pass from another direction.
Rushed scans create fake confidence. Slow, overlapping passes create usable information.
Temperature, Humidity, and Recent Cleanup
Freshly cleaned surfaces can fool you. So can a humid room. After extraction, steam cleaning, or heavy dehumidification, the surface and deeper layers often dry at different speeds. A wall can feel dry to your hand still read elevated below the finish.
The reverse happens too. Surface condensation or temporary dampness can raise readings near the face without indicating a deeper saturation problem. This is common in basements, crawl-adjacent areas, and HVAC problem spots during humid weather.
Context solves most of this. If the room just got cleaned up after a leak, document the date and conditions. Then compare readings over time instead of treating one pass as the final answer.
Pinless Vs. Pin Meters: When Each Tool Wins
This comparison comes up for a reason. A pinless meter and a pin meter do different jobs. One is not the “better version” of the other.
Why Pinless Meters Are Faster
Pinless meters win on speed and coverage. You can scan broad sections of wall, ceiling, and flooring in minutes. No patching. No pinholes. No stopping every few inches.
That makes pinless the better tool for mapping moisture spread. If you want to know how far a washing machine overflow traveled under laminate or how much of a bedroom ceiling is affected beneath a visible stain, pinless gets you there faster.
In practical property work, speed matters because water never respects neat boundaries.
Why Pin Meters Still Matter
Pin meters still matter because direct contact at the pins gives you a more precise point-specific reading, especially in wood. If you are checking framing lumber, subfloor moisture before installing new flooring, or trim moisture before repainting, pin meters provide confirmation that pinless tools cannot fully replace.
They are also helpful when you need to verify depth by pushing pins into a specific layer or into a small exposed area. That precision matters before rebuild decisions, especially when materials look dry but remain too wet to close up.
The Best Workflow Uses Both
The best workflow is simple. Use the pinless meter first to scan and map. Mark the outer boundary of elevated readings. Then confirm selective points with a pin meter or invasive inspection if the result affects demolition, drying decisions, or claim documentation.
That sequence saves time and reduces unnecessary holes. It also gives you a stronger inspection record. Broad scan for pattern, focused confirmation for decision-making.
How to Use a Capacitance Moisture Meter Step by Step
A good scan is methodical. Random waving gets random answers. If you are checking damage after a leak, treat the process like mapping, not guessing.
Start With a Known Dry Area
Start on the same material in a section that shows no signs of damage. If you are checking a stained hallway ceiling, first test a ceiling area farther from the stain. If you are checking a bathroom wall, first test the opposite side of the same wall or an unaffected section nearby.
That reading becomes your control. Without that control, you are staring at numbers without context.
Scan in a Grid, Not Random Passes
Move in overlapping passes, left to right and then top to bottom, like mowing a yard. Keep full contact with the surface and move slowly enough for the display to respond. Mark changes with painter’s tape or note them on photos.
Picture a second-floor bathroom leak that shows up on the ceiling below near the doorway. A random pass may catch the dark spot and miss the spread into the hallway wall. A grid scan reveals the footprint. That is the difference between patching one ceiling section and discovering the wall cavity also got wet.
Confirm Edges, Not Just the Wettest Spot
Most people chase the highest number. That is the wrong goal. The real goal is finding the edges of the affected material.
Repairs, drying plans, and insurance scope depend on the footprint, not just the peak. If a cabinet leak raised the center of one panel but moisture also traveled under adjacent toe-kicks and into the wall base, the edges matter more than the hot spot.
Keep scanning outward until readings return close to the dry baseline. Mark that boundary. Then recheck from another direction to confirm the shape.
Record Readings for Claims and Contractors
Documentation turns a scan into useful evidence. Photograph the meter on the surface. Capture the room, the suspect area, and the marked boundary. Add dates, times, and room names. Repeat the same locations later to show whether drying is improving.
That kind of record helps adjusters, remediation crews, and rebuild contractors understand what was affected and why certain materials needed to be opened or replaced. If you are trying to control claim friction, a clear record beats a vague verbal report every time.
Common Mistakes That Lead to Bad Readings
Most bad readings come from normal beginner behavior, not bad tools. The meter is usually doing exactly what it was built to do. The problem is interpretation.
Pressing Too Lightly or Scanning Too Fast
Loose contact produces inconsistent numbers. Fast movement does the same. The meter needs stable contact and enough time to register the material below the plate.
If your readings jump around wildly on the same smooth wall, slow down and repeat the pass. Most of the time, the issue is technique.
Comparing Different Materials as If the Numbers Match
Drywall, plaster, oak, laminate, and concrete do not share a universal baseline. A number that looks high on one material may be completely normal on another.
Always compare like to like. Same material. Same finish. Same thickness where possible. That rule alone prevents a lot of false alarms.
Ignoring Hidden Assemblies
Walls and floors are rarely just one thing. Tile over cement board, paneling over drywall, vinyl over underlayment, and layered flooring systems all change how the meter reads.
If you forget the assembly, you misread the result. A high reading over a tiled shower wall does not mean the tile face is soaked. It means the assembly under the scan is affecting the field, and you need to interpret that stack correctly.
Treating One Reading as a Final Answer
One reading is a clue, not a verdict. Good diagnosis combines patterns, repeat checks, visual staining, odor, room history, and other inspection methods. If hidden wet remains likely, a targeted opening or a look inside the cavity without tearing up the whole wall can settle the question quickly.
When a High Reading Signals a Bigger Problem
Some elevated readings are minor. Others point to a larger issue that needs immediate action, especially in occupied properties, rentals, and small commercial spaces where delays get expensive fast.
Leak Detection Vs. Moisture Mapping
A capacitance meter is strongest at moisture mapping, not source detection. That distinction matters. Leak detection means finding where the water entered. Moisture mapping means identifying where the water traveled and what materials got affected.
You need both. A supply line behind a vanity may be the source, but the damage footprint may extend into the wall base, adjacent bedroom flooring, and lower cabinetry. The meter helps define that spread.
Mold Risk, Material Damage, and Delayed Repairs
Wet building materials break down quickly. Drywall softens. Trim swells. Flooring cups. Insulation loses performance. Air quality complaints often follow because damp cavities support growth that does not stay politely inside the wall.
If your scan shows persistent elevation days after the incident, take that seriously. This is exactly how post-leak moisture turns into a mold problem when cleanup stops at the visible surface.
Delayed repairs also cost more. Water that stays trapped spreads damage outward and downward. A small claim becomes a bigger one.
Insurance Documentation and Scope Decisions
Readings matter in claims because photos alone rarely tell the full story. A stain shows visible damage. Moisture readings help show extent, drying progress, and the logic behind opening a cavity or replacing materials.
That does not mean a single pinless reading settles every dispute. It means documented readings, photos, room notes, and repeat measurements create a much clearer scope. For landlords and small commercial owners, that record also helps explain why a tenant complaint was not “just a stain” and why a repair had to move fast.
Choosing the Right Capacitance Moisture Meter
If you are buying a meter, skip the hype and focus on features that matter in real inspections. Fancy packaging does not improve a wet wall reading.
Material Settings and Calibration Options
Material settings matter if you plan to check more than one type of surface. Wood, drywall, plaster, and masonry do not behave the same way. A meter with useful settings or a reference mode gives you more dependable comparisons across real property conditions.
A reference or calibration check is also valuable because it helps you confirm the tool is behaving consistently before you trust the numbers.
Depth Range and Display Clarity
Depth range matters because moisture does not always sit near the face. If you are inspecting walls, ceilings, flooring, and subfloors after water damage, a meter with a practical depth option is worth the extra money.
Display clarity matters more than people expect. Dark basements, utility rooms, attics, and under-sink areas are not ideal lighting environments. A readable screen with a clear scale saves time and reduces mistakes.
Build Quality for Occasional Vs. Frequent Use
If you are a homeowner checking one suspicious area after a leak, you need a meter that is simple, dependable, and easy to read. If you manage rental units or small commercial properties, durability matters more because the tool will get used repeatedly, carried between sites, and relied on for documentation.
The right choice depends on use frequency, not on bragging rights. Buy for the actual job.
Frequently Asked Questions About Capacitance Moisture Meters
Can a Capacitance Moisture Meter Detect Mold?
No. A capacitance moisture meter detects moisture conditions, not mold itself. It tells you where material is reading wetter or electrically different than surrounding areas. That matters because mold follows moisture, but the meter is not a mold test.
Can You Use a Pinless Meter on Plaster, Tile, or Concrete?
Yes, and those readings are useful when you treat them as comparisons instead of absolute moisture content. Dense materials and hidden metal complicate interpretation, so baseline checks and pattern recognition matter even more on plaster, tile, and concrete surfaces.
How Deep Does a Pinless Meter Read?
Depth depends on the model and the mode. Some read only near the surface. Others reach deeper into the assembly. Deeper scans sense a broader zone, which is helpful for finding retained moisture but less precise about the exact layer causing the reading.
Are Pinless Moisture Meter Readings Accurate Enough for Insurance or Contractor Decisions?
Yes, when you use them the right way. Pinless readings are highly useful for moisture mapping, documenting affected areas, and tracking drying progress. For bigger repair or claim decisions, pair the readings with photos, room notes, visible conditions, and confirmatory inspection where needed.
What Should You Try First This Week If You Suspect Hidden Moisture?
Scan one suspicious area and compare it to a nearby dry section of the same material. Move in a grid, mark the boundary where readings rise, and photograph what you find. That one step gives you something concrete before you call for repairs or start a claim.
Need Professional Help?
Don’t risk further damage to your property. Bear Restoration‘s ‘s IICRC-certified team is available 24/7 for emergency restoration in Louisville, KY and surrounding areas.

Read Our Reviews