
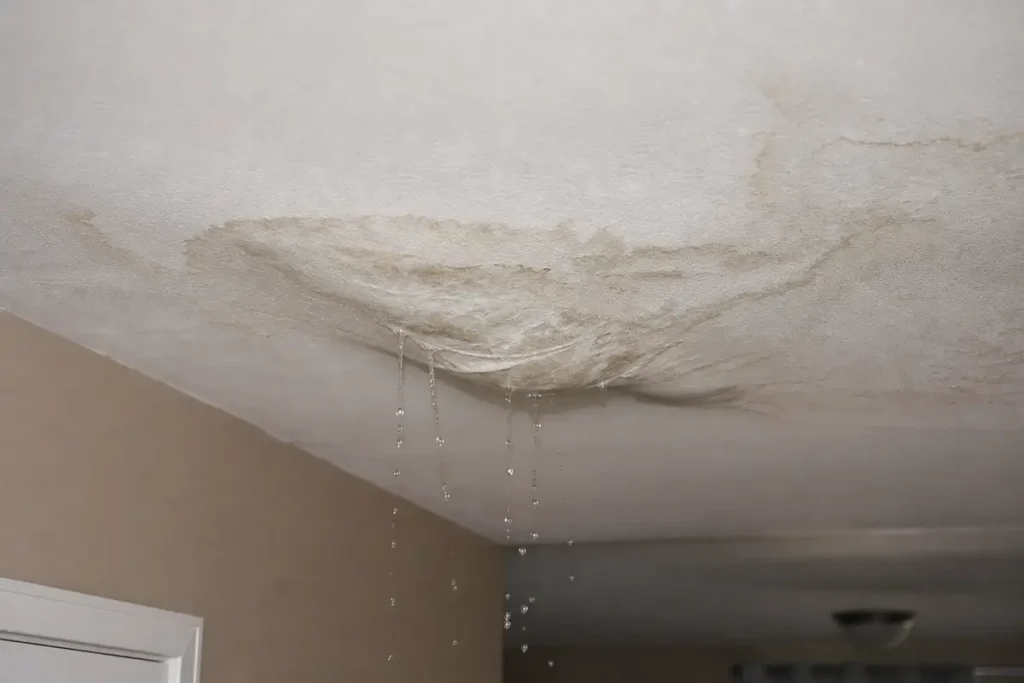
A second floor laundry room leak ceiling collapse is not a minor maintenance issue. In Louisville homes and small commercial buildings, a washer leak upstairs turns into sagging drywall, wet insulation, claim complications, and lost use of the room below faster than most owners expect. Based on analysis of water-loss jobs, the fastest response consistently protects property value, lowers total claim cost, and cuts rebuild time.
Why a Second-Floor Laundry Leak Becomes a Ceiling-Collapse Problem Fast
Water on an upper floor has gravity working in its favor and the building working against it. Once a laundry leak escapes the appliance area, it moves through finish flooring, subfloor, gaps at baseboards, pipe penetrations, and framing cavities. From there it saturates insulation and the ceiling assembly below, where drywall or plaster begins holding weight it was never designed to carry.
That is the turning point. A yellow-brown ceiling ring is a warning. A sag is a load problem. What the field data shows is simple: by the time the ceiling bows, the loss has already spread beyond the visible stain. Water has usually reached multiple materials and often more than one room.
Fast action changes the outcome. Delays push a basic dry-out into demolition, mold control, and finish reconstruction. Industry cost data places average restoration around $3,869, with common jobs falling between $1,383 and $6,378. Severe losses that spread through ceilings, insulation, and floor systems can exceed $15,000.
What Causes a Second-Floor Laundry Room Leak
Most second-floor laundry leaks come from the appliance connections, not from dramatic plumbing failures inside the wall. The visible damage downstairs often tricks owners into thinking the roof failed or a bathroom overflowed. In practice, upstairs laundry rooms are frequent culprits because they combine water supply, drainage, vibration, and repeated appliance movement in one small footprint.
The common sources are familiar to any IICRC water technician: failed washing machine supply lines, loose or split drain hoses, standpipe backups, leaking shutoff valves, overflowing drain pans, cracked pump components, and nearby plumbing failures at sinks or bathrooms that share the same wall. On older Louisville housing stock, especially mixed-renovation properties in Old Louisville, the issue often starts with newer appliances connected to older valves and marginal drains.
The Three Most Common Failure Points
The first driver is the pressurized supply line. When a hot or cold hose bursts, the water discharge is continuous and forceful until someone shuts it off. That is why supply-line failures create the fastest and most expensive losses. They soak the room, overwhelm thresholds, and push water into the floor system quickly.
The second driver is drain and overflow failure. That includes a drain hose slipping out, a standpipe backing up, or the machine discharging faster than the drain can handle. These events often produce category changes because wash water is no longer clean supply water.
The third driver is the slow hidden leak, usually at a valve stem, hose fitting, or pump connection. Those losses run for days or weeks. They soften subfloor, stain ceilings below, and create the kind of hidden moisture that gets missed until odor, staining, or sagging appears. In many cases, a leaking pump assembly or discharge issue is discovered only after the ceiling below shows damage.
Why Second-Floor Laundry Rooms Create Higher Damage Costs
A first-floor laundry leak usually spreads outward. A second-floor leak spreads outward and downward. That single difference expands the claim. Flooring, underlayment, subfloor, joists, insulation, drywall, trim, paint, light fixtures, and contents below all enter the scope.
Based on analysis of upstairs-loss patterns, the cost climbs because hidden cavities stay wet longer. Ceiling cavities and insulation slow drying. Water trapped over the ceiling below often requires selective demolition to release moisture and prevent secondary damage. That is why upstairs water leaks usually carry a wider rebuild scope than similar leaks on slab-level laundry rooms.
The Warning Signs That a Ceiling Is Close to Failing
Ceilings give warnings before they drop, but the warning window is short. The signs that matter are bulging, bowing, expanding stains, dripping, peeling paint, blistering texture, cracking tape joints, soft drywall, musty odor, and debris falling from a seam or fixture opening.
Sagging is the line that matters most. It is not cosmetic. It means the ceiling material has absorbed water, increased in weight, and started losing structural hold. Drywall weakens fast when wet. Plaster behaves differently, but once saturated it also detaches and falls hard, often in heavy sections.
Ceiling Sagging Vs. Normal Water Staining
An old stain that stays dry, flat, and unchanged is different from active water damage. The active version grows, darkens, softens, and starts deforming the ceiling plane. If the stain expands over hours, if the ceiling feels damp, or if the drywall face bows downward, the load is increasing and the response window is shrinking.
Field guidance aligns on this point: sagging and bulging are urgent warning signs, not watch-and-wait defects. A stain can be cosmetic. A sag is structural.
When the Area Becomes Unsafe
Some triggers require immediate exclusion of the area below. Active dripping near recessed lights or ceiling fans is one. A spreading bulge is another. Falling paint chips, wet plaster crumbs, separated tape joints, and any sign that the ceiling face is pulling away from the framing also make the area unsafe.
People, pets, tenants, staff, and movable contents should stay out from under the affected zone. Furniture can be removed only if the ceiling is stable enough to do so safely. No one should push the bulge, test it by hand, or stand below it looking up for long. That is how secondary injuries happen.
The First Four Actions After the Leak Starts
The first hour determines the size of the loss file. Based on analysis of claim outcomes, the recommendation is a four-phase response: stop the source, protect the area below, document conditions, and dispatch mitigation immediately.
Phase 1: Stop the Water Source
The water source gets shut down first. That means closing the washer supply valves, turning off the laundry shutoff if one exists, or shutting off the main water line when the source cannot be isolated fast. If the event is an overflow or standpipe backup, the appliance gets stopped and left off.
This is the only action that directly halts expansion of the loss. Every minute after that is about containment and documentation. In a true laundry overflow event, the sequence closely follows the same priority used for an appliance-flooded laundry room: stop water, stop the machine, isolate the area, then move into mitigation.
Phase 2: Protect People and Property Below
The next step is reducing injury risk and preventable content loss. Furniture, rugs, electronics, inventory, and paperwork under the leak path should be moved if the ceiling is stable enough to allow it. Buckets and towels help with drips on the floor, but they do not solve the structural problem overhead.
A ceiling bulge should not be casually cut or punctured by occupants. Controlled release is a trained procedure only after the area is cleared and electrical hazards are addressed. Once drywall turns soft, disturbing it increases the chance of a sudden break.
Phase 3: Document the Loss for the Claim File
Photos and video matter because the scene changes quickly once extraction and demolition begin. The source area upstairs, the wet floor, supply hoses, valves, machine model, standing water, ceiling staining below, damaged contents, and any visible spread into adjacent rooms should all be recorded before cleanup alters the evidence.
Insurance review focuses on cause, extent, and timing. Timestamped photos and video support the cause-of-loss narrative, improve scope accuracy, and reduce disputes over what was wet before mitigation began. The recommendation is to keep appliance details, maintenance records, and emergency invoices together from the start.
Phase 4: Call Mitigation Before the Damage Spreads
Once water reaches the ceiling below or sagging appears, this becomes an emergency mitigation event. Restoration dispatch should not wait for the stain to dry out on its own. Water damage inside a ceiling assembly does not self-correct.
The timeline matters because mold can begin on damp materials within 24 to 48 hours. Delay increases demolition scope, labor, equipment time, and claim complexity. It also extends downtime, which matters to landlords, managers, and small commercial operators tracking occupancy and revenue.
What the Drying and Restoration Process Actually Looks Like
One of the biggest points of confusion is the difference between emergency dry-out and repair. They are not the same job, and they are not billed the same way. Mitigation stops ongoing damage and dries the structure. Rebuild restores finishes after dry standards are documented.
Mitigation: Water Extraction, Demolition, and Structural Drying
Mitigation starts with moisture mapping, extraction, and inspection of affected assemblies. Technicians test flooring, baseboards, drywall, insulation, subfloor, and framing to define the wet footprint. If drywall or insulation is saturated, selective removal is often necessary so trapped moisture can escape. On category-2 losses from washer discharge or overflow, cleaning and sanitation requirements increase as well.
A mid-size second-floor laundry loss often needs 8 to 12 air movers and 2 to 4 dehumidifiers, with structural drying lasting 3 to 5 days. Daily monitoring is standard. Readings are taken, equipment is adjusted, and the drying log becomes part of the insurer-facing file. On jobs where ceiling cavities stay closed, drying slows and the chance of repeat moisture problems rises.
Rebuild: Ceiling, Flooring, Insulation, and Finish Repairs
Rebuild begins only after moisture readings return to acceptable dry standards. Then the damaged ceiling is repaired or replaced, insulation is reinstalled, upstairs flooring and trim are addressed, texture is matched, and paint work is completed. In plaster homes, especially historic Louisville properties, that scope can become specialized fast.
A ceiling stain fix alone fails when hidden moisture remains above it. Fresh paint over damp drywall simply hides the problem until odor, bubbling, or renewed staining returns. That is why mitigation and restoration must be treated as separate phases with separate deliverables.
How Professionals Find Hidden Moisture and Confirm the Source
Surface appearance is unreliable. A dry-looking ceiling edge can sit beside a soaked joist bay. A stained spot below the laundry room can be only the lowest visible point, while moisture has already spread laterally under flooring and behind walls.
Based on analysis of restoration jobs, hidden moisture is what drives repeat losses and later mold claims. The visible ceiling mark rarely defines the real boundary. The recommendation is professional testing, not guesswork.
Moisture Mapping and Material Testing
Moisture mapping uses noninvasive and penetrating meters, thermal imaging, hygrometers, and room-by-room documentation. Readings establish which materials are wet, how far the water moved, and what must be opened for drying. They also give adjusters and owners a defensible file instead of opinions based on appearance.
This matters for scope control. Accurate testing prevents both under-demo and unnecessary tear-out. In practical terms, it tells the team whether the ceiling cavity, wall base, or subfloor remains wet even after surface water is gone.
Leak Detection When the Source Is Not Obvious
By the time technicians arrive, the washer often is no longer leaking. That does not mean the source has been solved. Leak detection and plumbing assessment determine whether the failure came from a hose, valve, drain, pump, nearby supply line, or another plumbing fixture sharing the wall.
That step protects against a second loss after the dry-out. If aging rubber hoses remain in service, replacement is a direct risk-reduction measure. In properties with older hookups, upgrading to lower-failure hose options is one of the simplest prevention decisions available.
Cost, Insurance, and Claim Expectations
Cost is driven by scope, contamination, materials, and speed of response, not by the size of the stain alone. A small visible mark can still hide a broad wet cavity. A larger stain from a short clean-water event can sometimes dry with less demolition than expected. The field rule is simple: source and spread matter more than appearance.
The Four Cost Drivers
The first driver is water category. Clean supply water costs less to mitigate than contaminated discharge. The second is square footage affected, including vertical spread to rooms below. The third is material type, since hardwood, insulation, plaster, and specialty finishes cost more to dry or replace than standard drywall and carpet. The fourth is response time. Waiting increases damage.
Current pricing data places typical jobs at about $3,869, with common ranges around $1,383 to $6,384 and severe losses above $15,000. Mitigation often runs $3 to $7.50 per square foot, while repair and rebuild commonly add $20 to $37 per square foot. Standard ceiling repair may land between $440 and $1,720, but specialty finishes can go much higher. Historic ceiling work has reached $30,000 in documented cases where decorative material and rare labor were involved.
Why Laundry Leaks Often Shift From Clean Water to Gray Water
A burst supply hose usually starts as Category 1 clean water. A washing machine overflow, backed-up standpipe, or discharge-related event often becomes Category 2 gray water because it includes used wash water. That change matters immediately. PPE requirements rise, cleaning procedures expand, and porous materials are more likely to be removed than saved.
Cost follows that category change. Category 2 mitigation commonly runs higher than clean-water dry-out because labor, sanitation, and demolition standards are stricter. This is also why a “simple overflow” so often carries a larger invoice than owners expect.
What Insurance Commonly Covers and Questions Adjusters Ask
Adjusters usually review whether the discharge was sudden and accidental, what failed, how long the condition existed, what emergency steps were taken, and whether the loss involved neglect or long-term wear. They also review photos, mitigation invoices, moisture documentation, appliance details, and maintenance history.
Emergency dry-out and necessary demolition are commonly considered separately from finish repairs. That distinction matters. The claim file should clearly show cause, moisture spread, and why the rebuild scope exists. Promising claim outcomes is never appropriate, but strong documentation consistently shortens approval time and limits avoidable disputes.
How to Prevent Another Second-Floor Laundry Leak
Prevention has direct ROI. It lowers repeat-loss risk, reduces insurance friction, avoids tenant disruption, and protects occupancy. In second-floor laundry rooms, small equipment upgrades pay back fast because the downside of failure is so high.
The Five Prevention Upgrades That Matter Most
The highest-value controls are straightforward: braided steel supply lines, automatic shutoff devices, a drain pan with proper drain routing, water alarm sensors, and scheduled valve and hose inspection. Aging rubber hoses should be replaced on schedule, not after visible cracking starts.
That replacement schedule matters more than many owners assume. Washer hoses are consumable parts, not permanent plumbing. For properties with older appliances or unknown service history, a clear hose replacement schedule is one of the cheapest ways to reduce claim frequency.
Maintenance Practices for Older Louisville Homes and Rental Properties
Louisville’s housing stock creates its own pattern of risk. Old Louisville properties often have layered renovations, patched plumbing, older cast-iron or galvanized components, and floor systems that have seen decades of movement. East End homes often have newer appliances installed in builder-grade laundry rooms where pans and shutoffs were treated as optional. South End rentals frequently carry deferred maintenance at valves, drains, and utility connections.
The recommendation is periodic inspection of laundry hookups, drain flow, shutoff function, subfloor firmness, caulked penetrations, and nearby bathroom plumbing. Rental turnovers are a useful inspection point. So are appliance replacements and insurance renewals. Repeat-loss prevention is not glamorous, but it protects margins and shortens vacancy risk.
The Recommended Response Path for Louisville-Area Property Owners
The recommendation is decisive: treat second-floor laundry leaks with ceiling sagging as emergency mitigation events, not maintenance calls. The priority order is fixed. Stop the water. Secure the area below. Document the loss. Perform professional moisture testing. Complete mitigation. Rebuild only after dry standards are documented.
That response path delivers the best business outcome. It lowers total claim cost, shortens downtime, protects indoor air conditions, and reduces the chance that a simple laundry leak turns into a structural and mold-loss event. In Louisville properties, where older materials and mixed plumbing histories are common, speed and documentation are the two controls that consistently change the result.

Read Our Reviews