
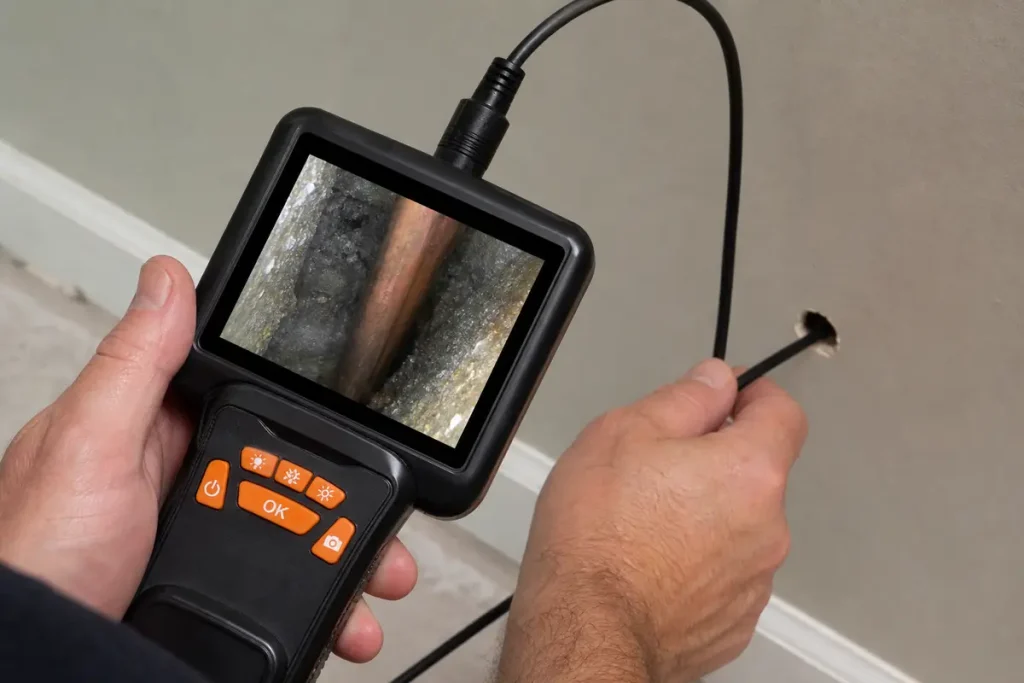
A stained ceiling or musty wall does not tell you the full story, and tearing open half the room to find one wet cavity is a bad plan. A borescope inspection gives you a direct look inside walls, ceilings, cabinets, and other closed spaces so you can find the damage path fast, document it clearly, and avoid demolition that does not need to happen.
What a Borescope Inspection Actually Does
A borescope inspection uses a small camera on the end of a flexible cable to look inside enclosed spaces through a tiny access hole. Think of it like peeking behind the stage curtain without ripping the whole theater apart. You feed the camera into the cavity, light up the space with built-in LEDs, and inspect framing, insulation, sheathing, backing paper, pipes, wiring paths, and residue patterns that never show on the painted surface.
That matters because hidden damage rarely stays where you first spot it. Water runs down studs, spreads across bottom plates, and pools under tubs. Smoke slips into soffits and ceiling cavities. Sewage contamination leaves residue inside wall voids long after the floor looks cleaned up. Storm leaks can travel from a roof penetration to a far-off wall corner before a stain finally shows up.
In a Louisville property, that hidden path often gets even trickier. Old Louisville homes with plaster walls, layered repairs, and irregular framing hide problems differently than newer East End homes with standard stud bays and insulated exterior walls. South End rentals and small commercial spaces add another layer, especially after repeated maintenance patches or older plumbing leaks. A borescope inspection cuts through the guesswork.
It also fits neatly into damage checks after water, mold, fire, sewage, and storm events. You use it to confirm what is happening inside the cavity before deciding how much needs drying, cleaning, or removal. That saves materials, time, and money. More important, it gives you evidence instead of assumptions.
When to Use a Borescope Instead of Opening the Wall
Use a borescope when the visible damage suggests a hidden problem, but you do not yet know the size, direction, or severity of what sits behind the surface. If drywall feels soft near a baseboard, if a ceiling stain keeps growing after rain, or if a bathroom wall smells musty even after cleaning, a small access hole gives faster answers than broad tear-out.
This approach works especially well for hidden moisture paths. A leak under a second-floor tub can stain a dining room ceiling 6 feet away from the actual source. The surface mark shows the symptom, not the route. A borescope lets you inspect the cavity and see where the wetting started, where it traveled, and whether insulation or framing stayed involved.
It also works well when you suspect mold growth, smoke residue, char behind finishes, sewage backup contamination, or storm-related leaks. If you already notice signs of hidden wall moisture, a camera inspection helps confirm whether the problem is staining only or active damage inside the assembly.
Here is the rule: if a tiny opening can answer the big question, start there. Full demolition comes later if the evidence demands it. That order matters, especially when insurance documentation, tenant coordination, or business interruption enters the picture.
What You’ll Need Before You Start
Before Step 1, gather the right tools and prep items. A clean inspection starts before the first hole.
- Borescope with lighted camera head
- Moisture meter
- Flashlight
- Stud finder
- Painter’s tape
- Marker
- Drill or keyhole saw
- Drop cloths
- Gloves
- Safety glasses
- Respirator for mold, soot, or sewage concerns
- Phone or notepad for photos and notes
That is the basic kit. The borescope shows you the hidden cavity, but the moisture meter tells you whether the problem is active. The tape and marker keep access points intentional instead of random. The drop cloth protects floors, especially on hardwood in older homes and finished basement surfaces where dust cleanup becomes its own headache.
Choose the Right Borescope for the Job
Pick a borescope with a camera head small enough to fit through a minimal access hole, usually around 8 mm or less for general property inspection. A semi-rigid cable works best for walls and ceilings because it bends, but still holds direction. A rigid model works in straight runs only. An articulating model bends at the tip and gives excellent control, but it costs more and makes the most sense when you inspect tighter, more complex cavities often.
Cable length matters. For most homes and small commercial spaces, 10 to 16 feet covers the job. Screen quality matters too. If the display is grainy or tiny, you will second-guess what you are seeing. Recording capability matters even more because photos and video become part of the repair file and insurance conversation.
A waterproof camera head is worth having, especially around plumbing chases, crawl access points, and wet wall cavities. Check the LED lighting controls too. Adjustable brightness is not a bonus feature. It is what keeps a shiny wet surface from turning into a white blur on screen.
Gather Safety and Documentation Supplies
Use gloves and eye protection every time. Add a respirator when mold, soot, sewage, or older debris enters the picture. If the inspection area has active contamination, place a drop cloth below the work area and keep a trash bag nearby for debris and dirty PPE.
Set up documentation before you start. Open a note on your phone or use a paper pad and create a simple naming system by room, wall, and height. Example: “Upstairs hall bath, east wall, 12 inches above baseboard.” That sounds fussy, but it keeps your findings usable later. If you want stronger moisture confirmation after the camera pass, it helps to understand how different moisture meters read materials before you start testing.
Step 1: Identify the Damage Pattern Before You Drill Anything
Do not start by punching holes. Start by reading the room.
- Walk the full area slowly and look for stains, swelling, bubbling paint, warped trim, floor cupping, soot streaks, odor, and discoloration near baseboards or ceiling edges.
- Check adjacent rooms, the floor above, the floor below, and the nearest plumbing fixtures or roof lines.
- Touch suspicious materials carefully. Damp drywall, swollen MDF trim, and soft cabinet backs give strong clues.
- Mark visible signs with painter’s tape so your inspection pattern stays organized.
- Write down the date, the suspected cause, and when the damage first became visible.
Success at this stage looks simple: you have a theory before you make a hole. Not a guess. A theory based on visible evidence.
Trace the Likely Path of Water, Smoke, or Contamination
Follow gravity first. Water drops, spreads, and follows framing. Smoke rises, then collects in upper cavities and horizontal voids. Sewage contamination leaves splash, residue, and soak patterns near the lowest points first. Storm leaks often start high, travel along rafters or sheathing, and show lower at a seam or corner.
Plumbing runs, HVAC chases, tub decks, window perimeters, roof penetrations, and exterior wall corners deserve extra attention. In an older Louisville home, plaster cracks, multiple patch layers, and non-standard framing can hide the true route. In a newer suburban build, the path is often cleaner, but insulation can mask how far the wetting spread.
Mark Likely Inspection Points
Pick spots that reveal the cavity while staying easy to patch later.
- Mark near baseboards for lower-wall moisture checks.
- Mark inside closets where small repairs stay out of sight.
- Mark behind sink cabinets for plumbing-related checks.
- Mark at ceiling edges for roof or tub-overflow paths.
- Mark near trim lines where patching blends more easily.
A smart access point answers a specific question. “Is this bay wet?” “Is the insulation contaminated?” “Did the leak travel from left to right?” If the mark does not answer a question, do not drill there.
Step 2: Check for Hazards Behind the Surface
A borescope inspection stays low-damage only if you avoid turning it into an electrical, plumbing, or gas repair. Before making any opening, treat the wall or ceiling like a cavity full of things you do not want to hit.
- Scan the area with a stud finder that detects framing and live wiring.
- Look for outlets, switches, plumbing fixtures, radiators, vents, and appliance hookups that suggest utility paths.
- Check the opposite side of the wall for sinks, toilets, hose bibs, or electrical panels.
- Stay clear of obvious vertical and horizontal utility runs.
- Move the entry point if the cavity looks crowded.
Scan for Studs, Wiring, and Pipes
Stud finders help, but visual cues matter just as much. Electrical lines often run vertically above outlets and switches, then horizontally through framing. Plumbing stacks and supply lines follow bathrooms, kitchens, laundry walls, and mechanical rooms. In older Louisville houses, expect surprises: irregular stud spacing, old abandoned lines, plaster over wood lath, and repairs layered over repairs. In newer homes, layouts are usually cleaner, but builders still route wires and pipes in inconvenient spots.
Use the stud finder to map framing first. Mark stud edges with tape. Avoid drilling into the center of a stud bay if the wall contains known plumbing or heavy electrical concentration. Aim for a location that sits clear of the obvious path.
Shut Off Power Where Needed
Cut power to nearby circuits when moisture, bathrooms, kitchens, charred materials, or unknown wall contents are involved.
- Identify the likely circuit at the panel.
- Shut it off before opening the wall.
- Confirm the nearby outlet or switch is dead.
- Keep the area dry underfoot while working.
- Restore power only after the inspection is complete and safe.
That one step removes a major hazard. Wet cavities and live wiring do not belong in the same sentence.
Step 3: Create the Smallest Useful Access Hole
https://www.youtube.com/watch?v=B_vtSzKXPYw
The goal is not “small” for its own sake. The goal is a hole just large enough for the camera head and nothing more.
- Confirm the camera head diameter.
- Place tape over the marked spot to reduce surface chipping.
- Drill or cut the minimum opening needed.
- Catch dust with a drop cloth and vacuum nearby if needed.
- Keep the edge clean so patching later stays easy.
In drywall, a small drill bit or neat keyhole opening works well. In plaster, go slower and expect brittle finish layers. In cabinet backs or toe-kick spaces, a clean hidden hole often gives better access than a visible wall surface.
Pick Low-visibility, High-value Entry Spots
Choose places that hide well and reveal a lot. Above baseboards, inside sink cabinets, behind furniture lines, in closet walls, or near ceiling-wall intersections usually work best. Under a vanity or behind a removable kick plate often gives a near-perfect angle for bathroom leak checks.
The trick is to avoid making your wall look like Swiss cheese. One well-placed hole beats four random ones every time.
Drill or Cut Cleanly Without Spreading Debris
Use steady pressure and stop as soon as you break through the finish. Do not plunge deep into the cavity. You are creating access, not tunneling. For dusty areas, especially older plaster or fire-damaged surfaces, keep a vacuum nozzle nearby and protect nearby contents first.
Clean edges speed up later patching. Jagged edges turn a tiny inspection hole into a bigger repair than necessary.
Step 4: Set up the Borescope for a Clear Image
A blurry first pass wastes time and gives bad information. Set the camera before insertion so the footage is usable.
- Clean the lens with a soft cloth.
- Turn on the screen and confirm battery level.
- Set recording to photo or video as needed.
- Adjust LED brightness to a middle setting first.
- Straighten enough cable to control the camera smoothly.
Adjust LED Brightness and Screen Settings
Brighter is not better inside a wall cavity. Wet plastic, foil-faced insulation, metal pipes, and glossy residue throw light straight back into the lens. Lower the LED output if the screen looks washed out. Raise it if framing disappears into darkness. The best setting is the one that shows texture, not just shape.
If you need another non-invasive check after the camera pass, heat-based leak tracing can help reveal a broader wet pattern around the same area.
Test the Camera Before Insertion
Run a quick test on a visible object.
- Point the camera at a screw head, wood grain, or printed label.
- Confirm the image is sharp at close range.
- Rotate the cable and note how the picture changes on screen.
- Start a short recording and play it back.
- Confirm your date and file storage are working.
This checkpoint matters. If the image is clear and your orientation makes sense before insertion, the actual inspection goes much faster.
Step 5: Insert the Scope and Inspect Slowly
This is where good inspections separate from rushed ones. Move the camera slowly, pause often, and inspect the cavity like you are searching a shelf in a dim closet for one specific tool.
- Insert the camera gently through the access hole.
- Advance a few inches at a time.
- Pause at each change in view.
- Rotate the cable slowly to scan the full cavity.
- Record or photograph anything suspicious before moving on.
Do not jab the cable forward. Do not whip it around. If you move too fast, every cavity looks the same and every clip becomes useless later.
Follow Framing Bays Methodically
Stay organized by using framing as your map. Inspect one stud bay or joist space at a time. Note where the camera enters, how far it travels, and what reference points appear, such as nail tips, pipe runs, insulation seams, or the back of drywall fasteners.
That method keeps you from mixing up findings from different sections. It also helps when you compare your camera view with other hidden moisture clues inside a building assembly….
Rotate, Pause, and Recheck Suspicious Areas
When you see a dark patch, residue line, insulation slump, or unusual texture, stop. Rotate the camera for a second angle. Pull back slightly. Re-approach from a different distance. A real problem stays visible under different angles. A shadow changes shape or disappears.
Use this checkpoint: if you can describe what you see in one clear sentence, you are getting a usable view. If your only note is “something weird,” recheck before moving on.
Step 6: Look for the Signs That Matter Most
A borescope image only helps if you know what to notice. Focus on practical evidence tied to the type of loss.
Spot Hidden Water Damage
Water damage inside a cavity usually shows up as darkened framing, damp sheathing, matted or sagging insulation, rusting fasteners, swollen wood fibers, drip tracks, or water beading on surfaces. Fresh moisture often looks glossy, reflective, or actively wet. Older staining looks flatter and more uniform, often with dry surfaces and hard-edged marks from past wetting.Water damage inside a cavity usually shows up as darkened framing, damp sheathing, matted or sagging insulation, rusting fasteners, swollen wood fibers, drip tracks, or water beading on surfaces.
Pay attention to the bottom plate area and insulation contact points. Water settles low and leaves its clearest story there. If the cavity view looks suspicious, confirm it with a meter. A camera alone does not tell you moisture content.
Recognize Likely Mold Growth
Likely mold growth appears as fuzzy patches, pepper-like speckling, uneven staining with texture, film-like surface spread, or clustered colonies on wood, drywall backing, paper facings, and insulation. The catch is simple: discoloration alone is not enough. Dirt, soot, old adhesive residue, and water stains can look similar on camera.
Pair the visual with odor and moisture readings. If the area smells musty and reads elevated, the finding deserves action. If you are trying to judge timeline and urgency, it helps to know how fast fungal growth starts after wetting….
Identify Fire, Smoke, and Soot Residue
After a fire or puffback, hidden cavities often hold more residue than the visible room surfaces. Look for black or gray soot deposits, streaking along framing, oily film on sheathing, melted insulation facings, blistered backing paper, and actual char on wood members. Heat damage often leaves warped or darkened surfaces with a sharper boundary than ordinary dirt.
Check above ceilings, behind trim, inside soffits, and in chases near the origin area. Smoke loves enclosed spaces.
Check for Sewage or Storm Contamination
Sewage and storm contamination leave a dirty story. Look for residue lines, clumped debris, organic buildup, insulation collapse, mud traces, and staining tied to the water line or spray pattern. Clean-water leaks usually leave simpler wetting marks. Contaminated losses leave solids, odor retention, and visible filth.
That distinction changes the cleanup plan immediately. A contaminated cavity needs removal and sanitation, not just drying.
Step 7: Pair the Camera View With Moisture Readings
A borescope inspection works best when you confirm what you saw with moisture testing. Appearances lie. A dark area can be old staining. A surface that looks dry can still hold elevated moisture inside trim, subfloor edges, or wall backing.
- Take baseline readings in a dry nearby area.
- Test around the stained or suspect section.
- Compare high and low spots.
- Record the numbers with exact locations.
- Match readings to what the camera showed inside the cavity.
Test Around the Inspection Area
Check walls, ceilings, trim, flooring edges, cabinet bases, and nearby adjacent surfaces. Work outward from the suspected center until readings drop back to normal. That pattern defines the wet zone better than the visible stain alone.
If you use a pinless meter, especially over painted drywall or wood trim, understanding how non-invasive moisture scanning works helps you avoid bad assumptions.
Decide Whether the Damage Is Active or Old
Active damage shows a current moisture source, elevated readings, fresh surface wetness, condensation, dripping, or continuing spread. Old damage shows dry readings, hard-edged stains, no active moisture source, and no recent progression. Lingering humidity problems sit in the middle: no obvious drip, but elevated readings and repeated musty conditions around poor ventilation or concealed condensation points.
That distinction shapes everything. Active leaks need source repair and drying now. Old staining may need cosmetic work only. Humidity-driven problems call for moisture control, not blind demolition.
Step 8: Document Everything for Repairs and Insurance
Good documentation turns your inspection into something useful. Bad documentation turns it into thirty random photos that prove nothing.
- Photograph the room before making access holes.
- Photograph each marked inspection point.
- Record borescope video slowly with verbal location notes.
- Save moisture readings by room and surface.
- Keep all files in one folder named by property and date.
If the loss becomes an insurance claim, organized records make the conversation cleaner. The difference between a smooth estimate and a frustrating back-and-forth often comes down to documentation quality.
Capture Photos and Video With Location Notes
Name files by room, wall, and height. “Kitchen sink base, rear wall, left side” beats “IMG_4827” every single time. While filming, say the location and what appears on screen: “North exterior wall, behind baseboard, wet insulation and darkened stud face.” That spoken note saves time later when clips start to blur together.
Create a Simple Damage Map
Sketch the room on paper or in a note app. Mark windows, doors, fixtures, visible staining, inspection holes, moisture readings, and hidden damage findings. It does not need to look pretty. It needs to tell the story clearly.
That map helps contractors, adjusters, and maintenance staff understand the path of damage fast. It also helps you compare what was found against what a formal inspection usually includes in the price if you bring in outside help later.
Step 9: Decide What Needs Drying, Cleaning, or Demolition
Now turn the findings into action. Not every cavity needs opening. Not every cavity can stay closed.
- Dry and monitor if materials are only lightly affected and still structurally sound.
- Open targeted sections if wet insulation, visible microbial growth, or trapped moisture appears in one defined area.
- Remove larger sections if contamination, spread, or structural damage extends beyond one bay.
- Fix the source before any finish repairs.
- Recheck moisture before closing anything back up.
Use Borescope Findings to Limit Unnecessary Tear-out
This is where the camera earns its keep. If the scope shows one wet bay under a window and the adjacent bay is dry, you limit demolition to the damaged section. If the cavity above the stain is clean and dry, you stop chasing ghosts in the wrong direction. That protects original trim, flooring transitions, plaster details, and tenant areas that do not need disruption.
For historic homes especially, targeted opening is the smart move. Original materials are hard to replace well.
Know When Hidden Damage Demands Immediate Removal
Some findings end the “monitor and wait” phase right away. Active mold growth in a damp cavity, saturated insulation, sewage contamination, charred structural members, and heavy soot deposits behind finishes need direct access and proper remediation. Leaving those materials closed up is not a strategy. It is delay.
If your camera confirms any of those conditions, move straight to cleanup planning.
Step 10: Patch the Access Point or Prepare for Professional Restoration
https://www.youtube.com/watch?v=KzBFxSfiC6w
After the inspection, either close the small hole neatly or leave the area ready for the next crew. Do not leave open access points unmarked and forgotten.
- Label the inspected area.
- Decide whether recheck access is needed.
- Cover or patch small holes if the cavity is dry and no more opening is planned.
- Leave strategic points accessible if mitigation or repair is scheduled soon.
- Bundle your notes, photos, and readings for handoff.
Seal Small Inspection Holes If No Further Opening Is Needed
If the inspection shows no ongoing issue, patch the access point or cover it temporarily until final cosmetic repair. Painter’s tape over a tiny hole is fine for short-term control in a utility area. In finished spaces, use a proper patch plan and keep the area labeled if follow-up monitoring is still needed.
If you expect a second moisture check in a day or two, leaving a clean access point open can make more sense than patching twice.
Hand Off Organized Findings to the Right Contractor
Send the right evidence to the right trade. Plumbers need location and leak path. Roofers need roof-side relation and ceiling evidence. Mitigation teams need moisture readings, cavity footage, and affected material list. Mold remediators need contaminated area details. Insurers need the timeline, photos, and organized proof of hidden damage.
A clean handoff cuts out wasted calls and repeat inspections. It gets the real fix moving faster.
Common Borescope Inspection Mistakes to Avoid
The biggest mistake is drilling blindly. The second biggest is assuming one hole tells the whole story. Damage spreads along framing, insulation, and gravity paths, so you need enough evidence to map it properly.
Another common error is moving the scope too fast. That produces blurry clips, missed clues, and bad decisions. Relying on the camera image alone is another problem. Without moisture verification, old stains and active wetting can look similar. Skipping documentation is just as bad. If you cannot tie a clip to an exact location, its value drops hard.
Avoid forcing the cable through insulation or around obstructions. If the cavity blocks the view, change angle or use a second access point. And never inspect near suspected live electrical hazards without shutting off power first.
Troubleshooting Common Borescope Inspection Problems
Even a good setup runs into problems. Fix the issue, then continue. Do not push through with bad visibility.
The Image Is Blurry or Washed Out
Clean the lens first. Then slow down. If the camera sits too close to a surface, pull back slightly. If the image is washed out, lower LED brightness. If it is dim, raise brightness a step at a time instead of jumping straight to maximum.
Use a visible target outside the wall again if needed. Confirm sharpness before reinserting the camera.
You Hit Insulation and Cannot See Past It
Do not force the cable. Gently pull back, rotate, and try a new angle. If batt insulation blocks the view completely, shift the entry point higher, lower, or slightly to the side. A second smart hole beats one useless struggle.
In dense insulation, the camera often sees best along the face of the batt or near the stud edge where a narrow channel exists.
The Camera View Is Confusing or Upside Down
Orientation problems are normal. Use landmarks. Drywall screw tips, stud faces, pipe direction, insulation seams, and bottom plates tell you what is up, down, left, and right. Before recording, rotate the camera outside the wall and note how the screen changes. Then keep the cable in that orientation as you insert it.
A small mark on the cable near the handle can also help you track camera rotation.
When to Stop and Call a Restoration Professional
Stop the DIY inspection and bring in a restoration professional when the cavity contains contaminated water, widespread mold, hidden electrical hazards, structural damage, burned framing, or heavy soot from a fire event. Stop when the affected area is broad enough that your next decision changes claim value, tenant safety, or code-related repair scope.
Stop when the camera confirms sewage residue, saturated insulation across multiple bays, active mold growth over a large area, or charred wood members. Stop when the source involves roofing failure, major plumbing breaks, or commercial occupancy concerns. Stop when formal documentation and mitigation protocols matter more than getting one more look yourself.
That line is not subtle. Once the inspection shows a serious loss, the next move is professional containment, drying, cleaning, and repair.
What Results to Expect After a Successful Borescope Inspection
A successful borescope inspection gives you a clear picture of the damage path, not just the visible symptom. You end up with evidence of where the problem started, how far it spread, what materials got involved, and which sections stayed unaffected.
That leads to smaller repair areas, tighter estimates, stronger insurance support, and less unnecessary tear-out. Instead of opening an entire wall because of one stain, you target the exact bay. Instead of arguing about whether the damage is current, you pair cavity footage with moisture readings and settle it with evidence.
That is the real win. You see inside the wall without turning the whole room into a project.
Your Next Step This Week
Pick the single most suspicious wall, ceiling edge, cabinet back, or tub-adjacent area in your property this week and inspect it with a plan. Mark the damage pattern, create one smart access point, move the scope slowly, and document what you find before the problem spreads any farther.
Need Professional Help?
Don’t risk further damage to your property. Bear Restoration‘s ‘s IICRC-certified team is available 24/7 for emergency restoration in Louisville, KY and surrounding areas.

Read Our Reviews